2010 Ultra
Limited Tune Experiment
(my experience with thanks to Ed
of "The Dyno Difference" in
Dallas)
Preface:
I finally made the decision to
replace my 2002 Ultra with a brand new 2010 Ultra Limited. My first
impression was, "Oh WOW! This is certainly different from the old bike".
Indeed, it appears that The Motor Company had decided to fix almost all of the nagging
problems in the older motorcycles, culminating in the 2010 and 2011 model year
bikes. I chose a 2010 instead of 2011 because it had the color combination
I wanted, blue on black. Otherwise, the two model years are virtually
identical.
My customization
includes new exhaust headers, new mufflers, new air cleaner, and probably new
cams. Knowing that an Electronic Control Module flash would be necessary
after each of these changes (and as I decide on which components I prefer),
I also chose TTS MasterTune as my gateway into the ECM. There are several
manufacturers of tuning products that allow alteration of tables in the ECM, but TTS
allows me to experiment and self-tune as I try the different components.
After I've selected components and have done the best I can with TTS, I'll have
a professional dyno tune using wide band O2 sensors in the exhaust header pipes.
The process I'm going through should, as a by-product, provide a good comparison
between self-tuning and professional tuning. This web page describes all
of the steps and comparisons I've made.
|
Here it is.
My first view of the new motorcycle at
the dealership - - - ->
From my touring experiences with
my good traveling friend where we made side by side comparisons of the
pulling power of my '02 Ultra to his bone-stock 2010 limited, I knew that
some work would have to be done to my new motorcycle. As with my 2002, I wanted an efficient
touring motorcycle, one that would get 40 to 45 mpg and also be able to
work into 30mph headwinds and long upgrades on the interstates without a problem. I plotted out a plan: New air cleaner, new exhaust, and maybe a
mild cam would be in order.
I selected:
-
Fuel Moto Jackpot
2:1:2 headers that have two sets of AFR sensor bungs for stock and
auxillary sensors
-
SuperTrapp
FatShots mufflers to be easy on my ears on those long 10 - 12 hour days
in the saddle
-
Vance & Hines air cleaner
-
TTS MasterTune, not
only because it allows self-tuning, but also because it has
provisions for speedometer calibration
-
Cam selection has not been made yet
but I'm leaning towards Screamin' Eagle 255's
|
.jpg) |
Before ordering any aftermarket parts, I put a little
over a thousand miles on the bike in the first couple of weeks and let the dealership do their 1,000
mile check-up. (the 1K maintenance was in the purchase agreement)
The Science Project:
I'm very lucky to have Ed at "The Dyno
Difference" nearby in Dallas. Without Ed, his equipment, his
experience/skills, and (most of all) his patience; this science project would
not be possible. Together, we plotted out a timeline. The specific
order of changes depended on when the aftermarket parts arrived.
Here's how it panned out:
Step 1: At
"The Dyno Difference",
do a series of 100% Wide Open Throttle pulls to produce a bone-stock baseline dynograph
Step 2: Installation of the
Jackpot 2:1:2 headers with the SuperTrapp mufflers.
Selected 18 discs per muffler and closed end-caps.
Step 3:
Home-tune the motor with
TTS MasterTune.
Also make speedometer corrections (it was indicating about 3% high compared to
GPS)
Step 4:
Put the motorcycle back on Ed's dyno again
and do another series of W.O.T. pulls to produce another Dynograph and make
tuning comparisons
Step 5: Install the
Vance and Hines air cleaner
Step
6: Back to "The Dyno Difference" for more W.O.T. pulls,
data comparisons and dynographs (basic VTune and advanced VTune dynographs)
Step 7: Ed will do a complete
"Dyno Difference" tune by hand, then comparison to the VTune tunes.
Step 8:
Make cam selection to suit my riding style and needs and install
Step 9:
More TTS tuning sessions to dial it in
Step 10:
Final visit to "The Dyno Difference" for compare TTS tune to manual tuning and
final WOT pull.
Each of these steps will be
documented with our notes and dynographs. Our goal was to observe each
individual change and what was gained (or lost) from each. Also, a
side-benefit would be to observe how the TTS MasterTune with novice user on the
road compares to a professional hand-tuning session on the dynamometer.
While the motorcycle was on the
dynamometer for the stock baseline runs, I also recorded sound levels
using my Radio Shack sound level meter. The measurements were taken 18"
behind and 18" to the side of the closest muffler outlet.
Step 1: Baseline Bone-Stock Performance:
Step one included a proper warm-up and then three Wide Open
Throttle pulls on the dyno to produce HP and torque curves on a graph.
This would be the baseline from which all subsequent sessions and dynographs
would be compared. For this pull the engine was warmed to 200 degrees and
typical transmission temperatures associated with the warm-up.
All subsequent pulls will be at the same ET and transmission temps.
Problem: The first pull produced HP and torque curves
that were significantly better than the following two. The second showed a
loss of torque and hp. The third was even worse. Something is causing
this. Ed immediately said, "Sumping, when
was the oil changed?" I explained that I'd just come from the dealership
where they did the 1,000 mile maintenance and presumably lube changes. I
usually do all of my own maintenance/modifications; but the 1K maintenance was
included in the purchase price of the new motorcycle. We removed the
crankcase plug and recovered 11 ounces of oil. May be sumping, indeed. The
crankcase should have only contained a few ounces, preferably less than 4 oz.
After removing the 11 ounces, the oil level dipstick still indicated full which affirms our suspicion that the
mechanic may have over-filled.
After another proper warm-up, Ed did three more WOT pulls.
Again, there was a torque dip in the same RPM regime, albeit much less than the
previous pulls. Pulled the crankcase
plug and drained another 6 ounces of oil. Maybe we should
have, but didn't do any more WOT pulls. The oil level on the dipstick now
showed slightly less than full. This will be my new fill level for the
duration.
Here are the results of the
bone stock sound level
measurements in the dyno chamber.
| Ambient sound in the dyno chamber, motorcycle engine
OFF, main exhaust fan ON |
72 db |
| Engine ON at idle |
84 db |
| Engine at 2,000 rpm, no load (dyno cooling fans both ON) |
91 db |
| Engine Wide Open Throttle at approximately 3,000 rpm
during WOT pulls (dyno fans ON) |
110 db |
| Engine Wide Open Throttle at approximately 5,000 rpm
during WOT pulls (dyno fans ON) |
116 db |
|
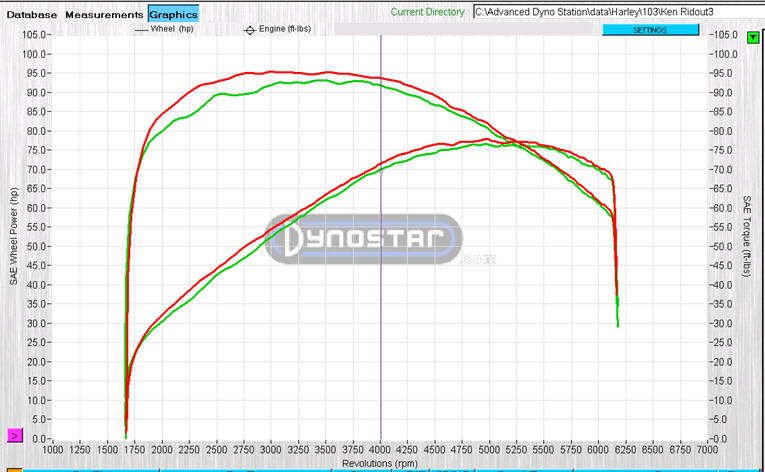
To the right are the three initial baseline
WOT runs. Notice the
drop in torque centered around 3,500 RPM. Ed's diagnosis appears
to have been
correct.
We drained the crankcase. It contained 11 ounces of oil,
most of which we believe shouldn't have been there. It makes sense that if
the crankshaft is sloshing in oil, that energy would be consumed.
It was explained to me that it's like wading in ankle-deep water.
After removing the oil from the
crankcase, we checked the oil level dipstick. The level was at the
"Full" mark.
The series of runs were performed at a
beginning engine temperature of 200 degrees. |
 |
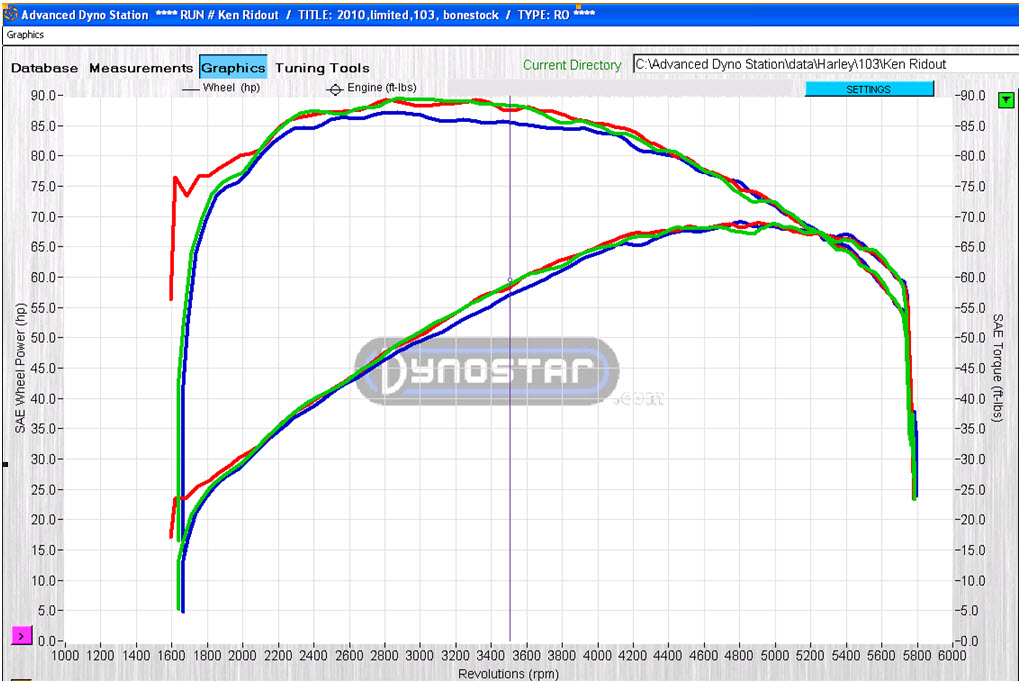 |
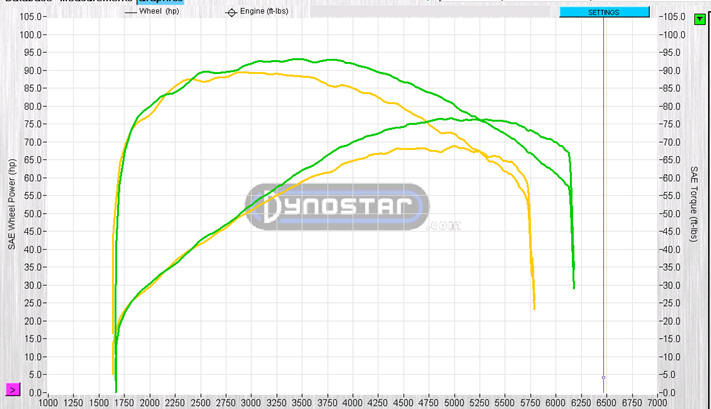
To the left are the subsequent baseline
runs after removing the eleven ounces of oil from the crankcase. Notice
how the 1st (green) and 2nd (red) are virtually identical; but the third line (blue)
has a dip in the torque curve and slightly less hp at 3,500 rpm.
We suspected more sumping. Sure enough, we drained 6 more ounces
of oil out of the engine crankcase after these three pulls.
In light of the situation, maybe we should have done one
more series, just to confirm that the sumping issue was solved, but we
didn't. When I got home, I pulled the crankcase plug one more
time. Only about 2 ounces was present. And now, the oil dipstick
indicates about 3/16" below the full level. I'm happy with that.
|
STEP 2: Engine Upgrade
#1, Exhaust System:
Wanted to install the air
cleaner first, but shipping was delayed. Instead, installed the FuelMoto Jackpot 2:1:2 headpipe
assembly which eliminates the catalytic converter and provides auxiliary 18mm O2
sensor ports. Also installed SuperTrapp Fatshots touring mufflers with 18
discs each and closed end-caps.
The Jackpot 2:1:2 headpipe assembly was
chosen because it is made of stainless steel, uses the stock exhaust shields,
and has the auxiliary O2 sensors for my WEGO and for as well as for dyno tuning with wide-band
sensors.
The FatShots were chosen because of the low
volume, performance, and total absence of snappy - blappy sound. This motorcycle is
for touring and I don't want a lot of ear-ringing noise but do enjoy the nice,
deep low-frequency purr.
STEP 3: TTS MasterTune:
I purchased TTS MasterTune from Doc on the
HTT forum.
I chose TTS for several reasons.
-
My touring friend has it for his two
motorcycles and enjoys swapping stuff and then self-tuning. He'll
advise me when I ask for home-tuning help.
-
Second reason was because it has
provisions for calibrating the speedometer. A second gizmo for speedo
calibration would have cost over $100 alone! (I like to see my GPS and
speedo match closely).
-
The third reason was so I could learn
more about electronic engine control, fuel injection, spark timing, etc.
-
Fourth is because it
is probably the best tuning software out there and give good results when
used properly and fully.
Even with TTS, my final tune is going to be
at The Dyno Difference where Ed can tune and measure results as he gets
the ultimate performance, efficiency, and rideability from the motor. I
need to know if my motor is operating at its best efficiency and performance.
I did an initial VTune
ride using the MasterTune "canned" map for my 2010 '103 engine with aftermarket
exhaust and stock air cleaner (DTA009-01).
My First MasterTune Experience included saving
the factory ECU map in case I ever wished to return to 100% stock. After that, I needed to select a table
that is similar to my motorcycle's build from the myriad of tables included
The lambda table cells for a build similar to mine needed to be changed to run
"closed loop" in all areas and the Power Enrichment needed to be turned off
before each tuning ride.
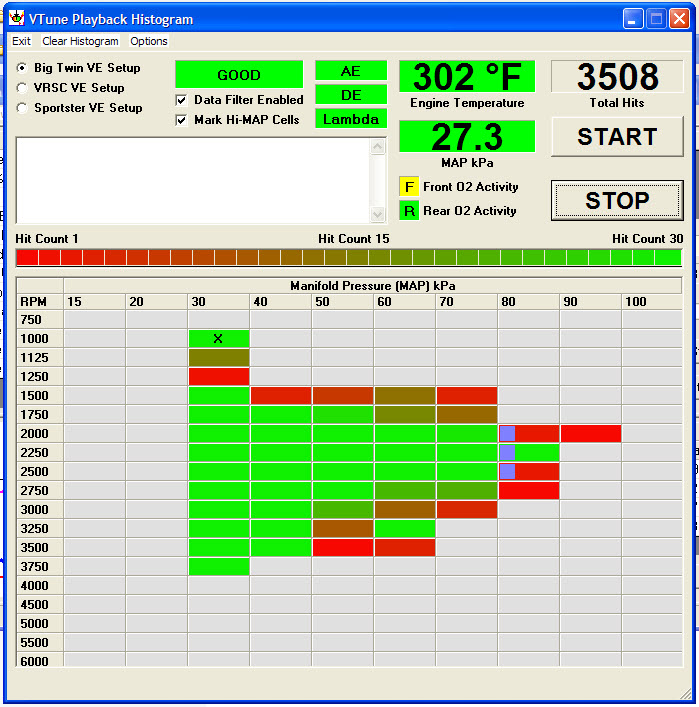 |
Collecting data is so easy that even a
caveman can do it (as Dan, my touring friend told me before I started).
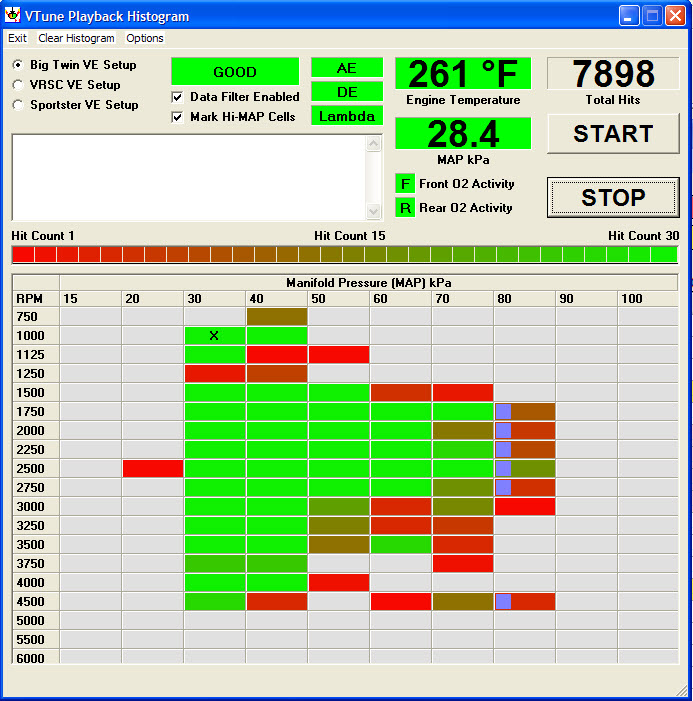
DataMaster has a provision for graphic display of
the cells at each RPM range versus Manifold Pressure (MAP) spreadsheet.
The cells are color-coded to show the range of "hits" from 1
to 30 or more. For me,
this meant that I could look at the cells and the data contained after completing the
tuning runs.
In the resulting VTune Histogram from my first
tuning run, all of the
cells in the areas in which I usually ride were filled in with green
(Hit Count =30 or greater).
I had to open the
throttle more than usual and drag the front brake just a little to get the 60 and 70 KPa cells 'greened-out'.
I even got some hits in 80kPa and a couple in the 90 kPa region.
However, I won't try to get hits in these areas in the future. It
required front brake dragging while hard on the throttle, even to the
point of going ABS.
All in all, the process was easy; so easy, in fact, that I doubted the results and
started over. A second tuning run from scratch showed about the
same results.
A caveman really can do it.
|
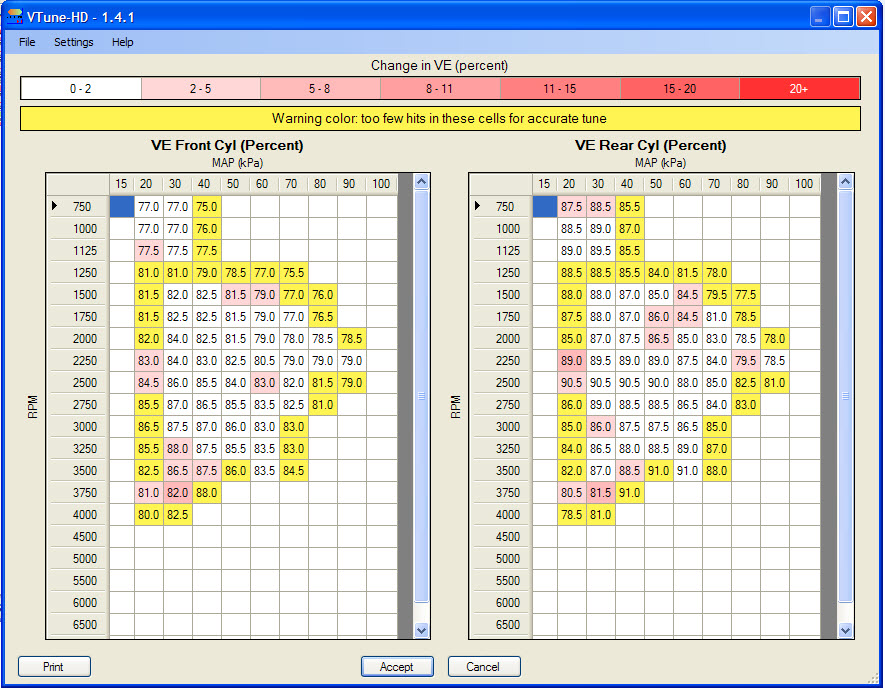 |
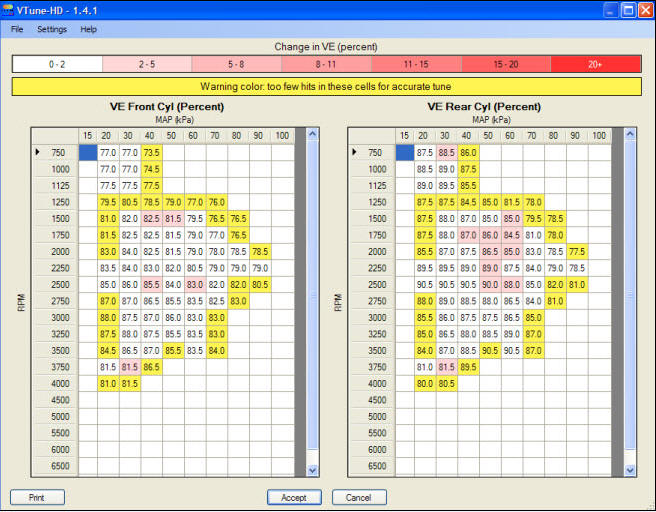
This VTune graphic is the result of
my initial 30-minute VTune ride. It shows
the difference between the previous tuning run and the one that was just
completed. The software displays this data just prior to
generating a new tune file for flashing the ECM.
My intention was to do a short ride to
get the VE's close, create a tune, and flash the ECM so that the motor
would be closer to normal AFR's for subsequent tuning runs and any
riding I might do afterwards. I didn't want to be riding around
with an abnormally lean or rich AFR any more than might be necessary.
What totally surprised me was the almost total lack of changes
required in the areas that got acceptable data hits.
The yellow cells and the large numbers of white cells outside the
yellow are those that my short tuning run didn't touch adequately or not
at all during my short 30 minute run. Only a spattering of pink
cells appeared.
Truly, I was
expecting to see VE Table cells that were from 5 to 15 percent off as
depicted in the manual.
Instead, the tables from their base map closely matched those from the
selected initial tables. |
Even with only 30 minutes
of riding around town and a few miles on the interstate, almost all of the cells
in my normal riding regime were filled. Odd, though, that the canned map
matched my VTune results so closely. I'd planned on more tuning before going back to
The Dyno Difference, but circumstances resulted in my going back the very next
day. No time for further VTune riding.
STEP 4: Dyno Testing
and Comparisons:
My experiment steps include going back to The Dyno Difference for
intermediate testing to see what kind of results I'm getting from the
aftermarket parts and TTS.
With the Jackpot 2:1:2 headers, we have the ability to insert wideband O2
sensors for data acquisition and analysis. My plan was to measure WOT
pulls for improvements from installing the different components, do AFR
comparisons, and also do sound level comparisons, from stock to completion.
The pulls were not started until the ET was 200 degrees. Transmission
temperature was not precisely measured, but assumed to be the same, run for run with
other tests since the engine OFF and ON times were simlilar.
 |
Here we are, back at The Dyno
Difference in Dallas. Without making any changes at all to the map
derived from TTS, we put the motorcycle on the dyno, did the
warm-up to the same temperature as the bone-stock baseline run in Step
2, and did a series of WOT pulls.
This is what we got. The green lines are
the bone-stock baseline and the blue are the results of the parts and
TTS tuning.
Needless to say, I was disappointed.
With the exhaust work, only (aftermarket headers and mufflers), the
torque curve was virtually identical to stock. Looks like
approximately 5 hp gain at the very top end, but that's it.
After we thought about it, these results should have been
expected. TTS doesn't tune the 90-100 KPa regions of the map (Wide
Open Throttle).
They must be done by hand extrapolation. I hadn't done the extrapolation so it
probably invalidated our WOT test. Interesting, nonetheless.
|
Target to measured Lambda
A better test would be a comparison of AFR command to the actual
AFR. (or Lambda command to Lambda sensed)
We also did that comparison between the target (command) and the actual
AFR resulting from my VTune session.
Using TwinScan, the target AFR command
can be read directly from the J-1850 data port. Using calibrated
wide-band sensors in the auxiliary O2 bungs on the headers, we measured the
actual AFR, also reported by TwinScan. Ed ran the motorcycle while on the
dyno in the different throttle/MAP regimes, just as if collecting data for a
full tune. He has an Excel table that converts the AFR sensed values into
Lambda. The results below are a comparison of the target Lambda with the
measured Lambda in the exhaust.
The engine was brought up to 200
degrees ET and typical transmission temperature for this and every test.
The AFR is corrected to Lambda values for
14.68.
Examples:
|
The table to the right is the target or
command read directly from the J-1850, captured by TwinScan-II, and
converted to Lambda after the initial 30-minute tuning ride.
VTuned MasterTune calibration file
DTA009-01-B2-001
File Name: DTA009-01-B2.MT7
Application: 2010 Drive-by-Wire Touring Bikes
Configuration: 1690 A/C and factory 2:1:2 Exhaust
Components:
-- Stock Air Cleaner
-- Jackpot 2:1:2 headers
-- SuperTrapp FatShots with 18 discs each
Below is the actual AFR resulting from
the target Lambda.
0.000 indicates that data was not
collected for the particular cell(s).
|
 |
|
To the right
is the AFR reported by the WEGO-II, converted to Lambda for
comparison to the target command from the ECM above.
The calibrated O2 sensors were
installed in the auxiliary bungs in the headers, data was recorded as Ed
went through a typical data collection process as if during a complete
typical dyno tune.
Lt Green =
Measured within .005 of target
Red =
Measured was >.006 higher measured versus target
Blue = Measured was <.006 lower measured versus target
White = Target and measured were both 0.000, data not collected
The difference between target and
measured appears to be significant, although this is only with one
tuning run and ECM flash. The higher MPA cells have not been
extrapolated.
|
 |
Sound Levels measured in the Dyno chamber
(Jackpot 2:1:2 w/SuperTrapp Fatshots, 18 discs per muffler):
| Ambient sound in the dyno chamber, motorcycle engine
OFF, main exhaust fan ON |
78db |
| Engine ON at idle |
84db |
| Engine at 2,000 rpm, no load |
91db |
| Engine Wide Open Throttle at approximately 3,000 rpm
during WOT pulls |
98db |
| Engine Wide Open Throttle at approximately 5,000 rpm
during WOT pulls |
116db |
As the data shows, this
exhaust system produced nominally
the same noise level as stock. Unlike stock, though, the sound was much
more pleasing for long-duration riding. SuperTrapp claims 10% greater HP
and torque. I didn't get it, though; not even close.
We're not seeing it so far, but one must remember, this is
without hand-extrapolation of the VEs where my tuning runs didn't affect.
Step 5: Installation
of the V&H Air Cleaner and VTuning:
After replacing the stock air cleaner
with the new Vance and Hines air cleaner with the DRAK cover, I did some rather
extensive VTuning. Sessions were each about an hour long. The first
was an in-town ride around to get the tables close. The next four were
combination city and highway riding. Pushed hard up hills and even dragged
the front brake a bit to get hits in the nether-regions. I rode at steady
throttle settings in 3rd, 4th, 5th, and 6th gear at speeds between 40 and 80
mph. I wanted to fill as many cells as possible; but without a display to
watch as the cells fill, it's a guessing game. I ride and hope that good
data is being recorded in all the cells.
To anyone that is considering TTS and
home-tuning, it's really important to get the laptop set up before going out for
tuning rides. Otherwise, it'll be going to standby, going to sleep,
turning itself off, running out of battery, etc. leaving you with incomplete
data.
My final VTune session produced this
VTune histogram:
 |
In
the resulting DataMaster histogram, all of the
cells in the areas in which I usually ride were filled in with green
(Hit Count =30 or greater). Some of the cells reported hit counts
nearing 200!
I had to ride in higher gears
than I like, open the
throttle more than usual, and drag the front brake a little to get the 60 and 70 KPa cells 'greened-out'.
I elected to take these steps only in the lower RPM regimes to avoid
abnormal brake rotor and pad wear. You can easily see that I
didn't collect as much data in the 60 - 80 kPa above 3,000 RPM and none
at all in the 5,000 to 6,000 RPM range.
|
 |
I
actually made four data collection runs over a week's time; creating a
tune file and flashing the ECM after each. This graphic is the
result of the final tuning run with the V&H air cleaner and the
previously-installed exhaust system. These displays are created by
VTune, just before it creates a new map for flashing into the ECM,
allowing the user to accept or reject the tune file before it is
generated.
Each of the sessions resulted in
different cells that required slight change from the previous data
collection. It appears that all that required changes were in the
2% to 5% range.
I didn't save the graphics from tuning run to
run. If I had, it would have shown the progression. With so
many files saved being generated and saved, it became confusing to me.
Unfortunately, the program doesn't allow changing the description
without re-saving as a new entire file (which creates a new file
creation date). |
At this point, my motorcycle has been tuned to the limits that
I put on myself regarding stresses on the engine and brakes during the tuning rides. The graphics
looked very similar to those presented in the manual, so I stopped.
I've done all the home-tuning that I'm going to do. I did not extrapolate
the VE tables out because I didn't totally understand what I would be doing.
The manual could be a little more instructive in this area for unskilled
customers like me.
It's now time to take the motorcycle back to The Dyno Difference for more
comparisons and a final tune by Ed.
Step 6: More Dyno
Comparisons:
Back to the Dyno Difference. We have four goals for
this trip:
- WOT runs to see what improvements the addition of the new
air cleaner made
- Extend the VE's into the MAP regions that weren't tuned
by TTS and make comparison WOT dyno runs
- Full Dyno Difference tune using the auxiliary wide band
O2 sensors for VE's, Lambda targets, ignition tables, enrichment, etc. with
comparison to the final TTS tune
- Comparison of the narrow band sensor O2 to the auxiliary
wide band sensors
After arriving, removing the saddlebags and left-hand side
cover, we rolled the motorcycle onto the dyno, strapped it down, prepared it
with O2 sensors, spark plug sensor, etc.. Preparation takes about a half
hour or more. It was time to see what the addition of the air cleaner and
my home tuning did for the WOT performance.
The results were somewhat gratifying.
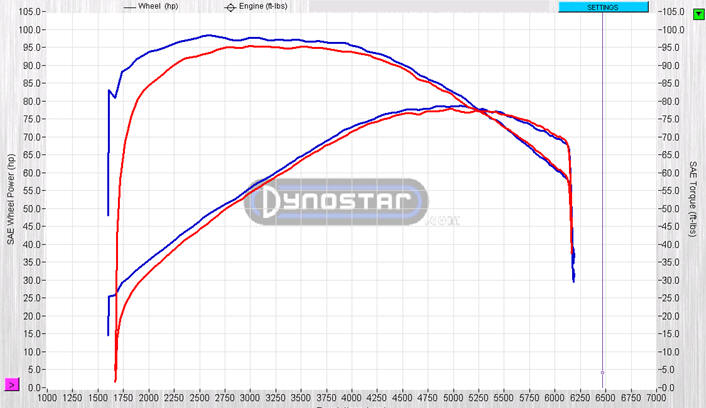
| TTS w/No VE
Extrapolation versus TTS With This
dynograph is a comparison between the TTS tune with no extrapolation of
the VEs as compared to the same tune WITHwith extrapolation. The
motor has the FuelMoto Jackpot headers, SuperTrapp mufflers with 18
discs and closed end cap, and the Vance and Hines K&K air filter.
Extrapolation felt like guessing what they would be
if I could get the motor into the various regimes. In my case, the
80, 90, and 100 kPa cells for each RPM regime were too lean. The
extrapolation enrichened those cells. Maybe that's the typical
scenario, but I'm not sure what the result would have been if
extrapolation had called for leaner mixtures than present for those
cells. Was I lucky? Or is this by default?
|
 |
|
Stock
Baseline versus TTS Before VE extrapolation)
This dynograph
displays baseline factory-stock torque and horsepower to the
torque and horsepower graph resulting from the FuelMoto head pipe,
SuperTrapp mufflers with 18 disks each, and the Vance and Hines K&N air
filter assembly. VTUNED with TTS but without extrapolation of the
VEs.
The torque and
horsepower gains above 4,000 RPM were significant with almost 10 ft lbs
torque gain at 5,000 RPM and 10 hp gains at the rear wheel.
The lack of torque
gains in the 3,000 RPM and below was bewildering. But we still
wanted to do the VE table extrapolation. Maybe it would make a
difference. |
 |
|
Bone Stock Base versus
TTS Tuned w/Extrapolation
We
extrapolated the 80, 90, and 100 kPa cells of the VE tables using the
data derived from the green cells produced in the latest DataMaster
histogram as described in the manual. We filled the higher MAP kPa
VE
cells for each rpm regime with whatever the average VE from last green
cell in the histogram. We also looked at adjacent rpm regimes to
see a normal progression. In a few cells, we fudged the VE
slightly to make smooth transitions from adjacent cells.
This was done for both cylinders.
We applied our best guesstimates as
the data was extrapolated. I'll be quite honest in saying that a
lot of performance change was not expected; extrapolating the VEs seemed
like a guessing game.
Then, after warming the engine ET back
up to 200 degrees, Ed did another series of three pulls. All three
produced nominally the same HP and torque curves. We were
surprised.
- Bone Stock is in yellow
- Our TTS result with extrapolated
VE's is in red.
NOTE: The Dynostar smoothing is
set to ZERO, no smoothing. The TTS tune produced a smoother torque
graph than the canned stock map from HD.
|
 |
We could have stopped at this point. The motor has
gained 5 ft lbs of torque at 3,000 RPM, 10 ft lbs of torque at 5,000 RPM, and 12
horsepower at 5,500 RPM. The torque curve is smooth, the motor starts and runs
well, and a typical home-tuner would probably be relatively satisfied with the
results. It appears that TTS has lived up to its promises. Without
WOT dyno runs, a home-tuner would not know this; but our runs bear this out.
Could a home-tuner get a better tune? Probably, with a lot of practice,
better data for extrapolation, and a knowledge of spark advance and how to tune
it. But unfortunately it seems that without a dyno run, one would never
know.
We had one more test to do before completion. It was
time for Ed's professional tune and comparison to my best TTS effort.
Step 7: Professional
"Dyno Difference" Tune and Comparison:
Ed prepared a completely new initial tune file for his dyno
tune. It included turning spark knock sensing OFF, PE OFF, and setting the
VE's and Lambda tables to comfortable starting point. Then he ran the motor
though different RPM and throttle settings while TwinScan gathered data. I
don't totally understand all that is required for a custom tune, but the process
was lengthy. He gathered data, adjusted VEs, ran the motor on the dyno
some more, gathered more data, adjusted VEs again, ran the motor even more,
until he was satisfied with the VE tables.
Ed ran the bike on the dyno and watch the
TwinScan reported live AFR data versus the AFR Command or Target.
Until these values for both Front Cylinder and Rear Cylinder overlay as closely as
possible the tune is not complete. More partial throttle running and data
collection is done and adjustments are made as necessary. We keep running this
test until the overlay of Live data and Target data is as close as possible.
Indeed, watching the TwinScan program, the AFR Measured matched the AFR Command
under every running condition that I watched as he tested.
I watched again as he dialed the Dynostar's curser to hold the
engine at RPM ranging from 2,000 to 3,500 while he slowly went from light
throttle to full throttle at each setting and listened for pinging. With
TwinScan, he could also display the recorded data for knock sensor to confirm
what he heard or didn't hear. Take a little timing out at the rpm ranges
that produced knock and run through the process again; he did this several times
before showing satisfaction.
Then, Ed did yet another series of WOT pulls to confirm that
the timing changes didn't cause changes in AFR command. This whole tuning
process took about 3 hours. I lost track of time because of the boredom of
watching the same processes over and over. My job was to turn the dyno
chamber ventilation ON and OFF as required for each test. It's really
noisy in there with all the fans running, even with the motorcycle OFF.
The final test is
to put the bike back in closed loop operation in the cruise area and compare
what the live AFR values from the bike are now doing as compared to the AFR
Command or Target. This test is nice, as he can compare what my
motorcycle's NB sensors
are seeing versus what the bike is actually doing. This verifies correct
operation of the OEM NB sensors as they should match the tuning sensors
exactly. Once satisfied that these values overlay as close as possible it
is time for a test ride out on the street. The test ride is verification
of smooth starting (cold and warm), smooth acceleration, absence of pinging, and
deceleration without exhaust popping.
It should also be noted that exhaust noise after the tuning
were nominally the same as before. Tuning had virtually no effect on
noise.
RESULTS COMPARISON TIME!
It's time to compare Ed's Dyno Difference tune to my best
TTS MasterTune.
 |
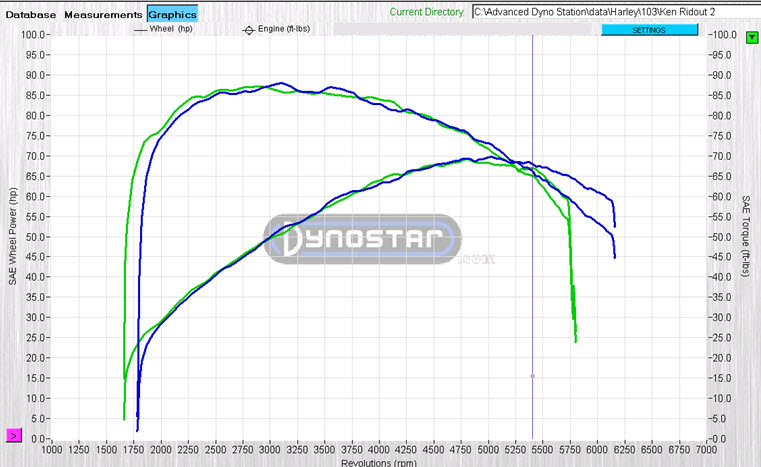
This is the comparison
of Ed's tune to my best TTS tune! To
recap, this is with air cleaner and exhaust work, only; no cams or head
work.
The blue lines are the result of Ed's manual tuning
using TTS and Twinscan.
The Red lines are the result of my best TTS
MasterTun (including VE table data extrapolation)
The missing torque improvements at the lower RPM
have been found! The torque and HP gains from TTS versus Ed's tune have stayed the
same from about 4,500 RPM and higher, but large torque gains in the
lower RPM regime are now evident.
Oddly, the lower torque curve below 3,000 RPM was
in the range where DataMaster showed the most hits and I felt most
confident in the VE table extrapolations. I wonder how one
would know if the motor has more potential than I achieved without a
dyno comparison.
|
FINAL TUNING COMPARISON TO BONE-STOCK BASELINE
|
The adjacent graphic is the comparison between the baseline bone-stock
WOT pull and the final Dyno difference-tuned WOT pull. As with all
our testing, the engine temperature was at 200 degrees with transmission
temperature approximately the same as all previous runs.
To recap:
Yellow Lines: 2010 Ultra
Limited, bone stock
Blue Lines: Same motorcycle with
V&H Draco air filter, Jackpot 2:1:2 headers, and SuperTrapp mufflers
with 18 discs each.
Both pulls depicted here were done at a
200-degree ET with similar transmission temperatures.
|
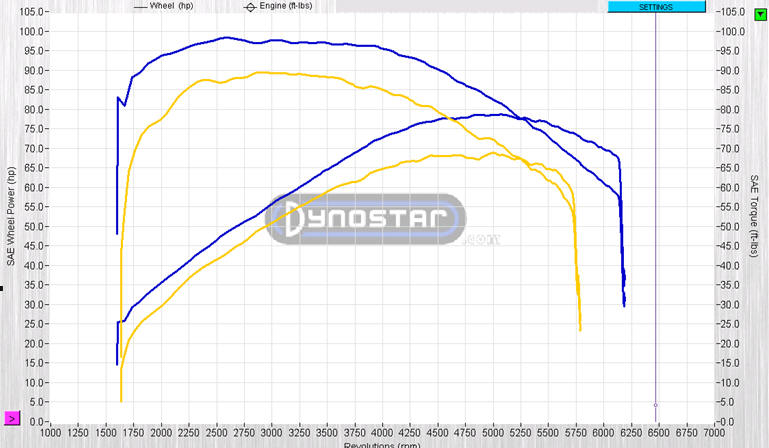 |
There was a large torque gain between 2,500 and 3,000 RPM, but
I would have liked to have seen the torque curve continue to rise past 2,600 RPM
to peak at about 3,200 before slowly dropping off. Instead, it kind
of flattened out.
However, the
engine's performance may be enough to suit my requirements for an efficient
touring motorcycle for cross country travel as well as parking lot exercises
without the downside effects of a finicky aftermarket cam. Instead of rushing to
change cams, I will wait a while and carefully make my cam decision. I'd
like to go on at least one long-distance trip before changing cams to see how
the motor copes with wind and hills at highway speeds. I keep thinking
that the SE 255 cams would be a good choice (I bought a new set a few weeks
ago). But then I keep reading about warm start problems due to the intake
closing degrees that cause very high CCP. With the SE255-s, though, I'm
sure that the torque curve would exceed 105 ft lbs in the 2,500 to 3,200 RPM
range (where my motor spends the vast majority of its time).
Update: I discovered that my clutch
throw-out adjustment was a little tight. On a rapid acceleration through
the gears entering the Interstate, the clutch definitely didn't hook up for each
gear until in 4th at about 80 mph. Then I could hear the engine speed
match the wheel speed. Maybe it was slipping a little at the high-torque
mark in the dynograph. In any case, I properly adjusted the clutch and
will hot-rod it in an acceleration lane again soon.
Also before choosing cams (should I decide to), I will also do
a few of my famous gas mileage runs. I usually do 75 to 80 miles out, turn
around and come and
back (150 to 160 miles total) on Interstate 30 on selected calm-wind days with
precise fuel fills before and after. Bone stock on a trip to the Texas
Hill Country a few weeks ago yielded mileages of 38 to 40 miles per gallon.
It would seem that with the increased efficiency of the engine, that mileage
would increase.
Conclusions So Far:
TTS MasterTune does exactly what it's billed to do. I am
an unskilled customer, probably typical for TTS's customer base. I worked my way through the initial learning curve
to calibrate the speedometer and eventually get a reasonable tune file flashed
into the ECM. With Ed's help, the VEs were extrapolated in the areas in
which I could not reach on the road, resulting in an even better tune file.
But after spending over a thousand dollars in aftermarket
components and an additional $400+ for TTS, I needed to know what the motor's potential was; and did I get
close with my home tune.
Ed has spent hours of his own time as well
as time on his dyno to meticulously test each of my experiment stages before performing the final
tune. Without a dyno final run and then comparison tune, I
would really never know what the gains of my engine and home-tune might have
been. I'm also happy
to make all of our work public so that others might benefit from my experience
and Ed's patience and time.
When I make my cams decision, I'll do more VTuning before
taking the motorcycle back to Ed for another final tune.
In the meantime, it might be fun to do a tuning run on the
current Dyno Difference tune ECM flash and see what changes TTS thinks needs to be
made. Of course, I won't be re-flashing afterwards, no matter what the
comparison might show. Ed's tune is the final one for this build.