ECM Tune
(my experience with thanks to Ed
of "The Dyno Difference" in
Dallas)
Jump to March 10th Tuning and Testing
Preface:
|
I wanted good useable power for my
touring motorcycle, a 2002 ElectraGlide Ultra Classic. So I
upgraded it to 95 cubic inches, installed
Bishop's Performance
Stage One heads, Andrews 21N cams with hydraulic cam chain tensioners,
and a Doherty Air Cleaner. I also installed a
Power Commander and a map for a build similar to mine.
This combination should put the peak of the torque curve in the rpm
range in which I cruise, considering the aftermarket Baker DD-6
transmission upgrade. The stock exhaust "Y-Pipe" broke so I
replaced the stock exhaust with a Vance and Hines True Dual exhaust
system. I was worried about "torque dip" but didn't want to deal with
another Y-pipe.
I also wanted a quieter motorcycle;
easier on my ears for long-distance days of touring. I like to
hear the wind and the radio. So I purchased and installed a set of SPO Touring
performance mufflers.
The motorcycle performed well, had plenty of
power, and was a joy to ride. However, the SPO mufflers are not
all that quiet, with their straight-through design an open-ended
baffles. I also had trouble getting them to stay straight on the
exhaust headers; they wanted to rotate and droop. They also tended
to pop a lot on deceleration. I was determined to like them, though.
Even bought a used spare set.
|
 |
Touring with Friends:
Most of my trips were with friends; two of
which had Harley Sportsters. We stopped for gas every 100 miles maximum so
the Sportsters could refill. Of course I filled my tank at each stop, too.
As they say, "One should never pass up an opportunity to get fuel." It
seemed that my motorcycle might not be getting the same fuel mileage as the
other motorcycles, but I never really checked.
Last year, both of the Sportster riders
upgraded to big bikes. Annie got a new Road Glide; Dawn a new Softtail
Custom. No need to stop at 100 miles any more. 130 to 140 miles
or greater was more like it. . . . . except that my motorcycle seemed to need
more fuel than the others. If we tried to push the mileage past 140 miles,
I was always the first rider pointing to my gas tank.
Soon, I began to get
the hint. Something might not be right with my motorcycle. If I
didn't fill at 130 miles, I'd run a risk of running out of gas before reaching
the next town or station. On a
recent trip to Colorado and Utah, I pulled into gas stations on fumes while my
riding partners still had a gallon left. It was getting embarrassing . . .
I was the one with so much engine and transmission work for a more efficient
ride, yet my motor was always thirsty.
Initial Custom Tuning, July 26, 2008:
At this time, my engine was still at 88 cubic
inches of displacement, but with true dual exhaust and SPO Touring mufflers.
Unhappy with the mileage and popping
deceleration, I took the bike to Ed, the owner of
The Dyno Difference for a custom
Power Commander tune. First, Ed checked throttle position, throttle body condition,
etc. He cleaned my washable air cleaner. He inserted O2 sensors
probes way up through the mufflers and into the headers. Then, I watched
and learned as Ed went through the steps of measuring the air/fuel ratio at
different throttle settings as well as wide-open throttle runs to display peak
torque and power. He also did some W.O.T. runs, listening intently for any
hint of pinging. Ed then downloaded my Power Commander tables
into his system and made modifications where needed. After the mods, he'd
upload the tables back into my motorcycle's Power Commander. Then, more
runs on the dyno to measure the results. At each step, he would save the
current and new settings, labeling each for future reference. He went
through the process several times.
Finally, over 4 hours later, he said it was finished.
| Ed is a perfectionist when it comes
to tuning a client's motorcycle. I watched as the hours rolled by.
No amount of time is too much when it comes to tuning. He commented that
with a Power Commander, only AFR and a few other general adjustments could be
made. Other parameters are not available for tuning with this
system.
 |
 |
Engine Upgrades:
Before visiting The Dyno Difference again, I
installed the Bishop's Performance Stage 1 heads, and "big bore" to 95 cubic
inches. I also installed the Screamin' Eagle Street Touring mufflers.
| The Screamin' Eagle Street Touring
mufflers replaced the SPO mufflers. These S.E. mufflers are advertised as
"Performance" mufflers (without the noise). I was told that
some people didn't like the S.E. mufflers because they were "too quiet".
PERFECT! That's exactly what I wanted;
Quiet Performance!
The local dealership had a set on their bargain
table. I bought 'em. I tried different tips and
finally decided to make my own.
I loved these mufflers (or so I thought). |
 |
Second Custom Tuning,
December, 2008:
I purchased the license/key to use the Direct
Link tuning tool. Ed prefers the
Direct Link tuning tool. Direct Link is like an aftermarket S.E.R.T.-
package. This product allows adjustment of all programmable parameters in the ECM including idle, ignition tables, starting AFR, etc. as well as the fuel
tables.
|
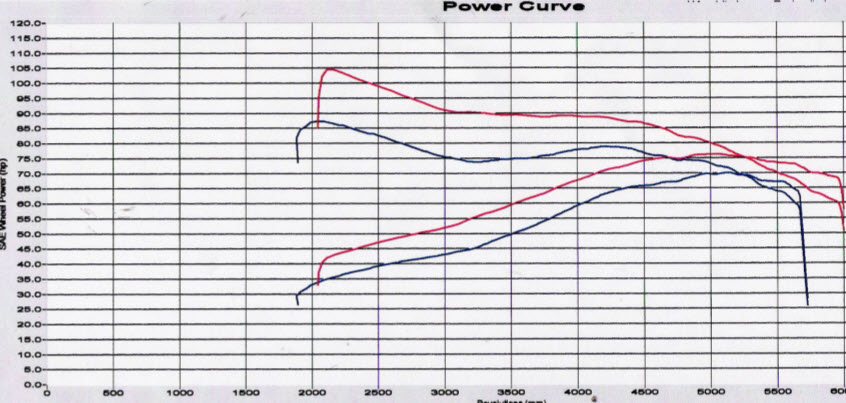
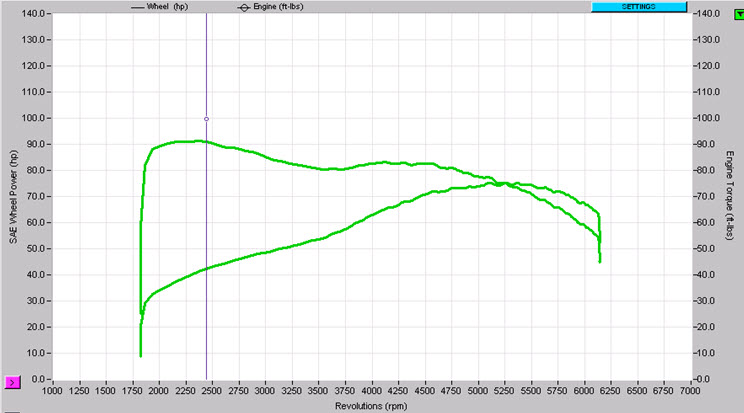
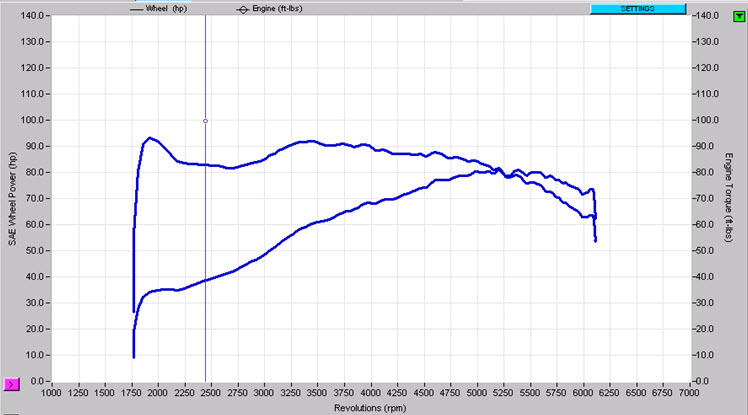
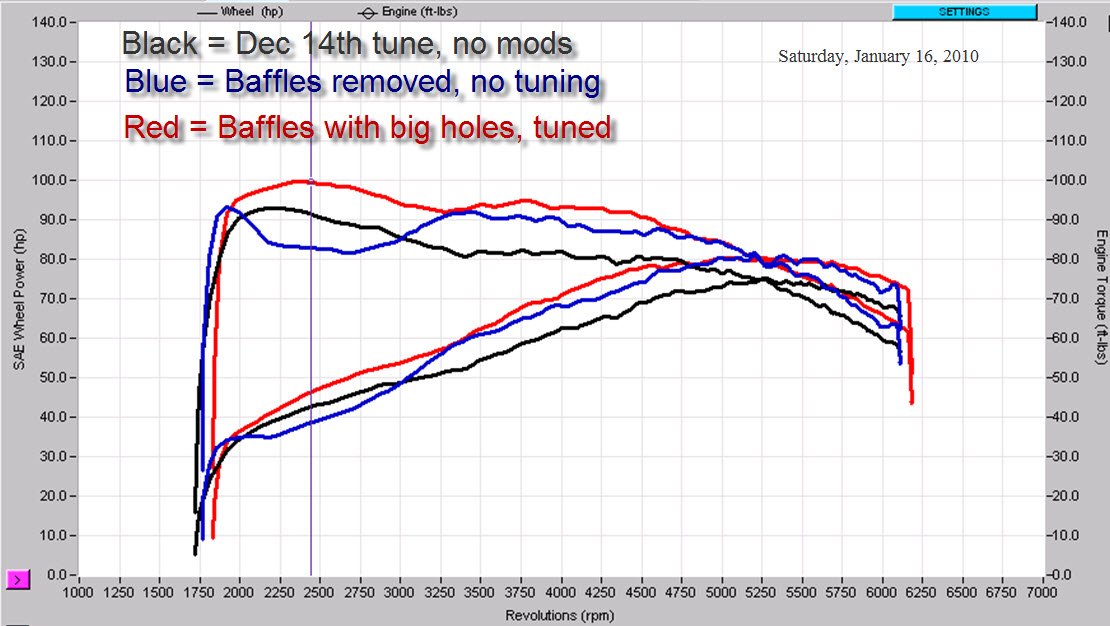
TUNE 1 : TUNE 2 COMPARISON
The blue line is initial tune on July 26th.
The red line is the December 2008 tune using
Direct Link, which included displacement increase to 95 cubic inches and
Bishop's heads. |
 |
Third Tune Session, April 14,
2009:
Maybe between tunes #2 and #3 was when I
really began to notice the poor fuel consumption. I'm not exactly sure since so
many changes had taken place over the past year. This is also when the
girls bought their new motorcycles and we quit stopping for gas at 100 miles or
less. In any case, Ed was concerned about my poor mileage and asked me to
bring the bike to his facility to check and adjust. He leaned out certain
areas, etc. The changes were very minor. Even after all of this, my
fuel mileage tests and trips over the next 6 months didn't show any
improvements. It was frustrating. I tried to forget about the poor
mileage and simply enjoy my motorcycle. Thoughts of a new 2010 Ultra
Limited entered the conversations between Judy and me at home.
Fourth Tune, December 14, 2009:
Having little measurable results from the
previous session, Ed asked me to bring the bike back again. He could have
said, "Ken it's as good as it can be." But instead, he wanted to make
certain for his own piece of mind as well as for customer satisfaction. Again, he worked for hours, reading, making adjustments,
saving files, uploading, more runs, more adjustments, more saving files, etc.
etc. etc. 3+ hours later: Finished.
|
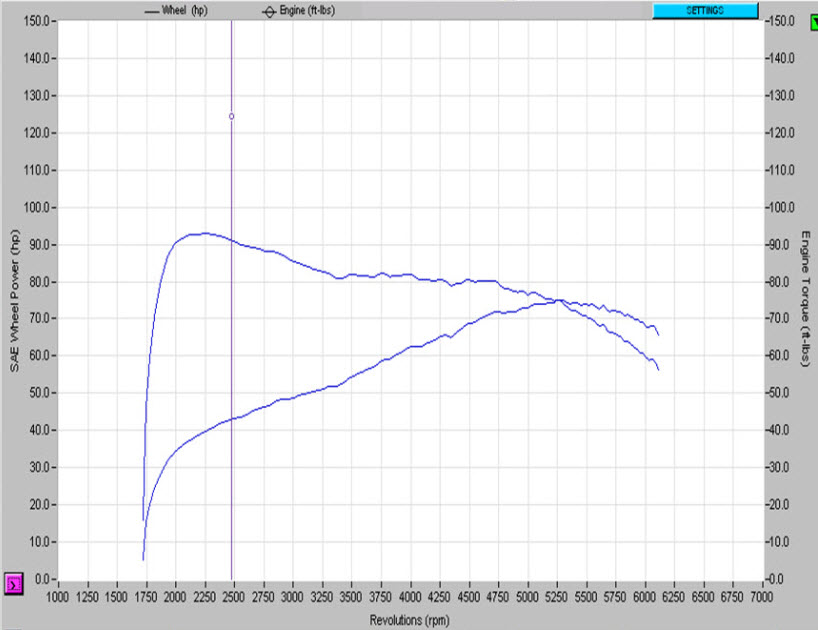
December 14, 2009 Tune
The result was a reasonable dynograph
and a very rideable well-mannered motorcycle; quiet, with plenty
of power for my style of riding.
But notice that the torque falls off prior to my 6th
gear cruising rpm of 2700. As one HTT member noted, maybe this was an indication of a
problem.
I began to post my dilemma on the
HTT forum.
There, some very knowledgeable professionals guided me to question the
Screamin' Eagle mufflers that I liked so well. |
 |
After all of this work, the fuel
efficiency/range improved, but not much. After a 150 mile trip riding
side-by-side with a friend and I needed an extra gallon more gas than he did
when we stopped to fill upon our return. My mileage for the trip was 34.5
mpg, though . . . the best I'd recorded in years. Maybe this WAS the
best it was going to be.
Butchered the Baffles:
I started a
thread on
the HTT forum about engine builds versus gas mileage. It turned out to
be a well-read and informative thread. The advice from the HTT forum
members prompted me to
check for oil sumping in the engine's crankcase and poor compression.
I did both. The engine is sound. Thankfully, neither conditions were
present. I do all of my own work; problems in this area would have been do
to my workmanship.
The
only other unknowns were the true dual headers and the Screamin' Eagle mufflers.
It was time to take the next step. Ed said "Bring it back again.
We'll try stock mufflers and/or no mufflers. I'll be available at 4PM.
|
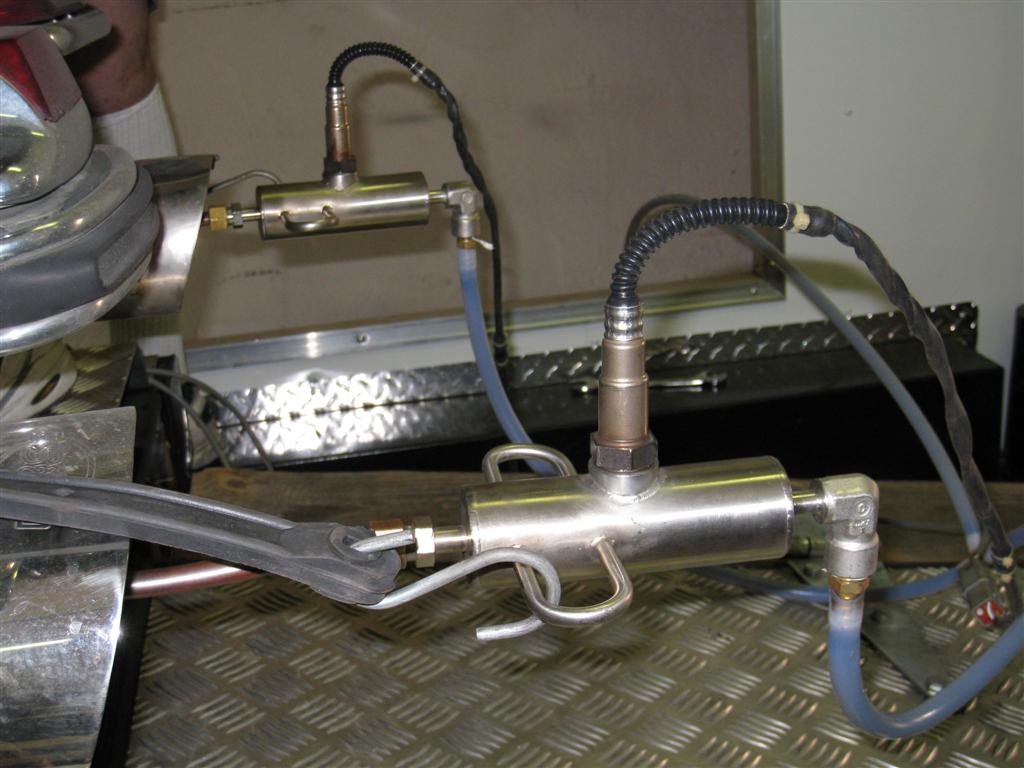
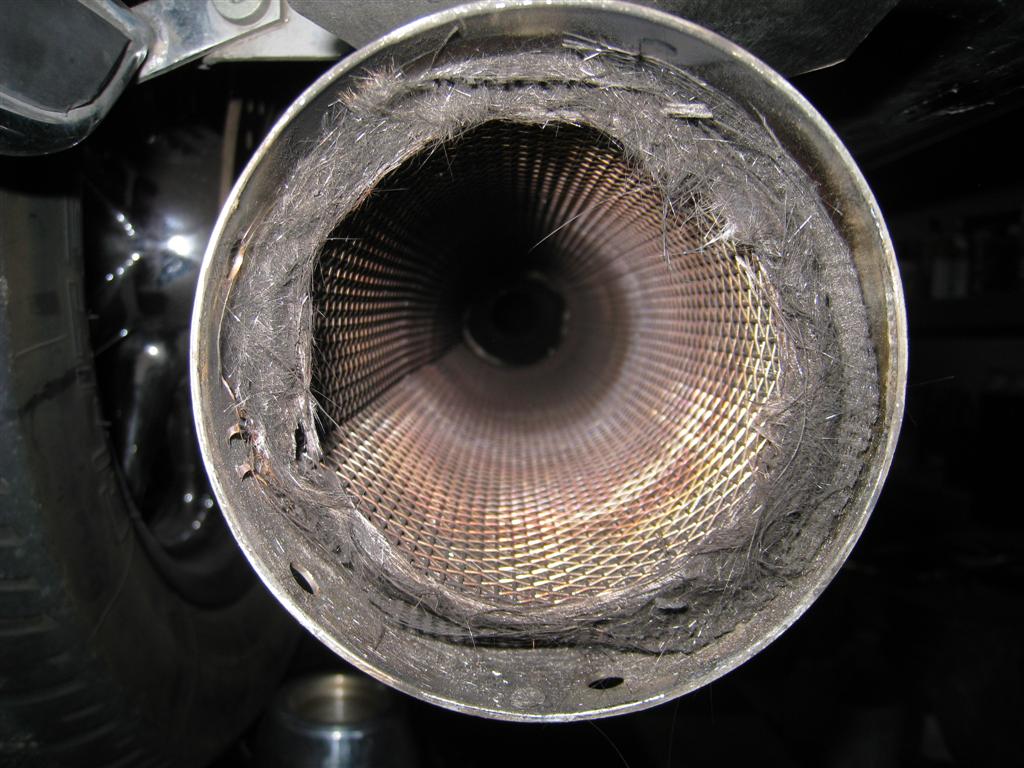
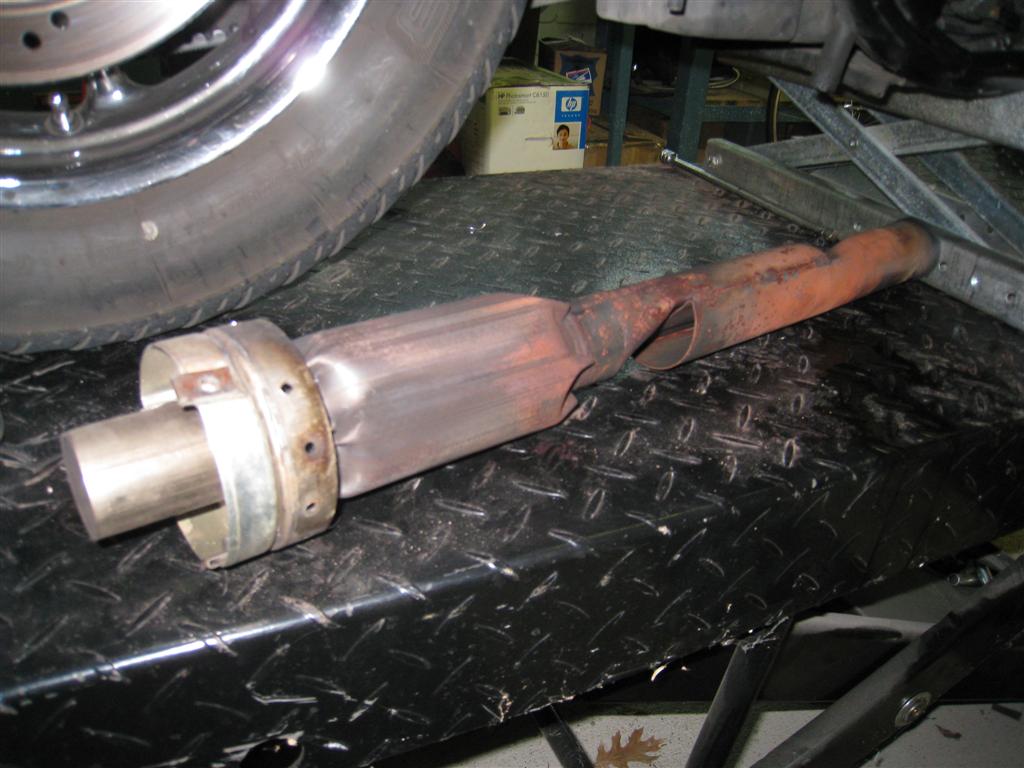
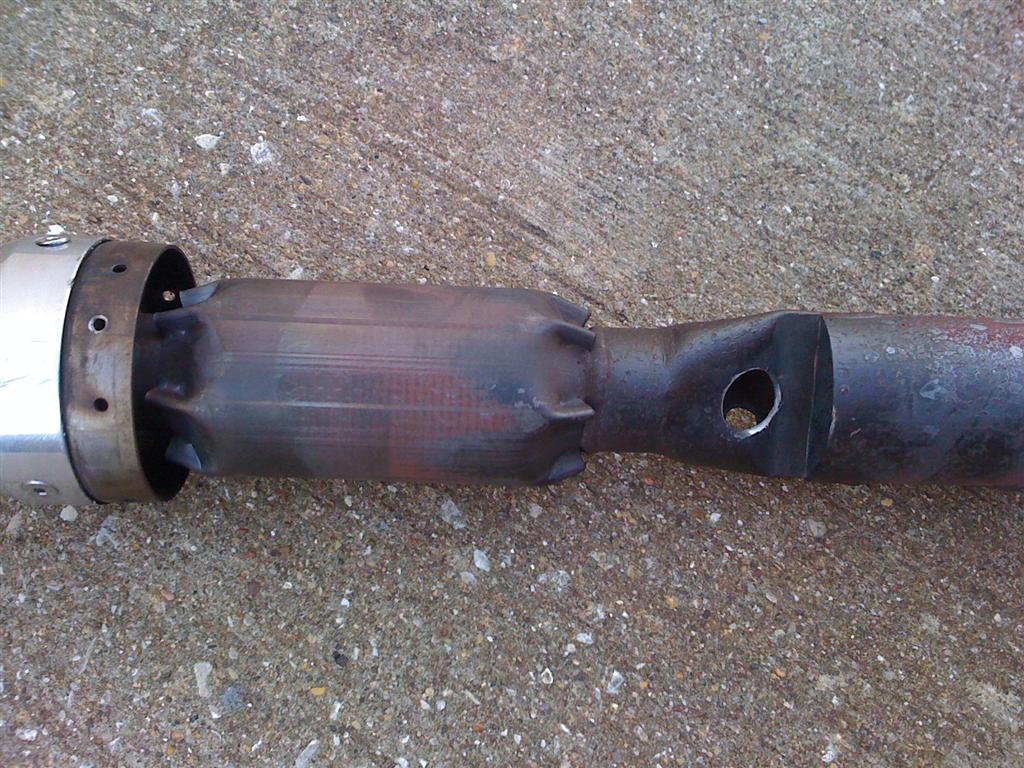
BAFFLE WORK
While waiting to go to Ed's business, I removed the baffles from
the mufflers. They appeared to be restrictive to the exhaust
gasses; requiring the exhaust to make two difficult 180-degree turns
from inlet to outlet. The path between the two turns looked very
restrictive, being only about 3/8" of an inch thick (in a ring around
the welded baffle bodies).
In the picture to the right, one can see how the exhaust travels through the
inlet squashed pipe, around the welded pipes, back through the output
squashed pipe, and finally out of the muffler. Below is the
muffler body showing the insulation packing.
|
 |
|
|
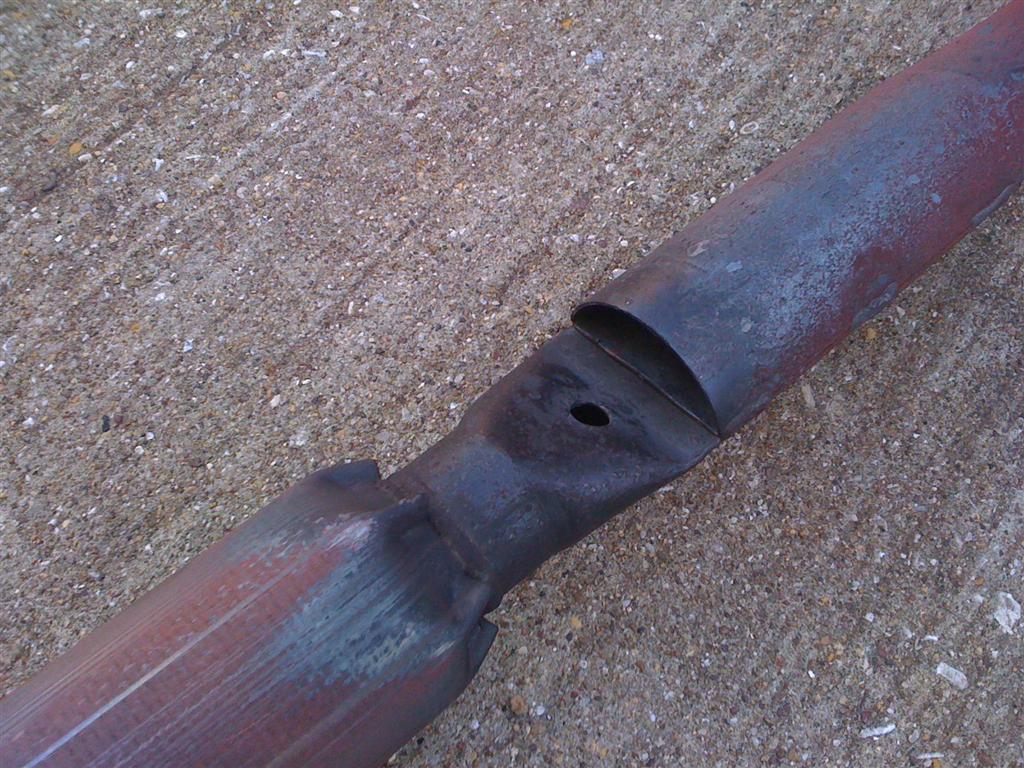
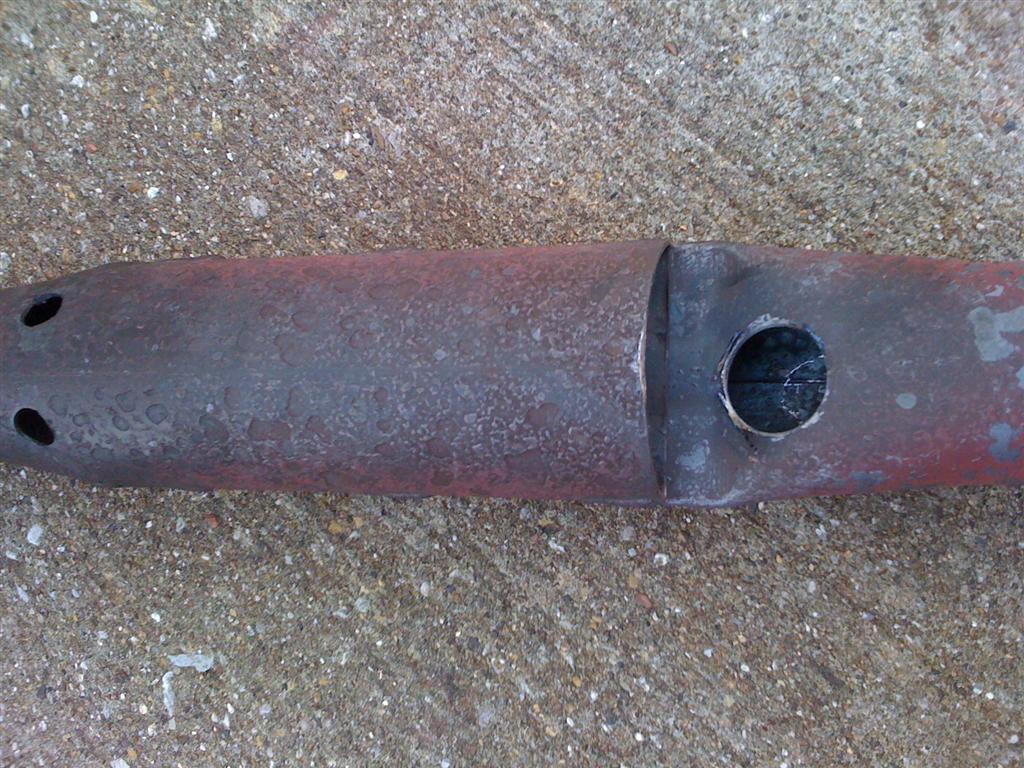
HALF-INCH HOLES IN
BAFFLES
My initial modification included three half-inch
holes; one in line with the flow and two on the opposite side to
short-circuit the original design exhaust path. Re-installed
the baffles and went back to The Dyno Difference for another tune.
Although idling in my workshop, the exhaust was louder, as I rode to his
facility, the mufflers produced about the same noise level as before drilling the holes.
I was doubting any measureable difference on the dyno.
|
 |
 |
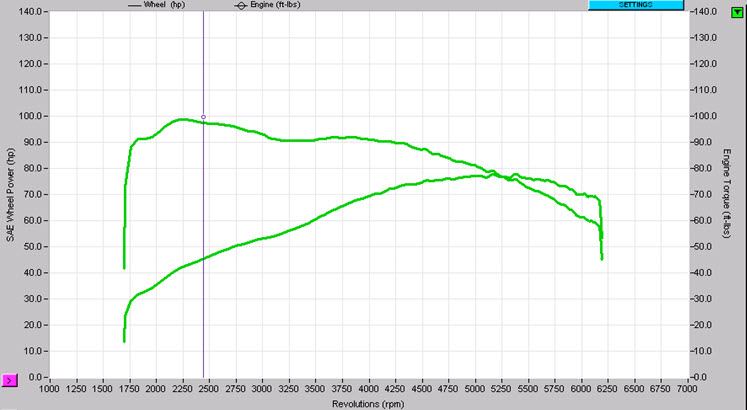
Fourth Session
January 16, 2010 (It has become a Science Project):
Ed was as intrigued and frustrated as me,
regarding the performance after his hard work on my motorcycle's tuning.
"This is turning into a science project!" Indeed, it was. Ed had
"inherited" my problem and wanted success as much as I did.
| BAFFLES WITH SMALL HOLES
We rolled it up onto the dyno, did all the normal
pre-run hook-ups, O2 sensor installations, etc. followed by some warming
up through the gears. It takes about a half hour from rolling in
the door before it's ready for a run.
Finally a WOT dyno run. The results
were disappointing. The torque and HP curves were almost identical
to the non-butchered baffles; maybe a very small gain in torque in
certain areas of the graph.
The three holes in each baffle made no significant
difference at all.
|
 |
Well, we decided to try something extreme:
Totally remove the baffles from the mufflers altogether and see how the torque
and HP curves looked.
|
NO BAFFLES
The results were astounding! This is where
the word "performance", as it pertains to these Screamin' Eagle mufflers
is proven a mistake.
What we got was 10 extra ft lbs of torque and 7
additional horsepower. Folks, that's a 10% increase! Or to
put it another way, These Screamin' Eagle mufflers rob a tuned motor of
10% of it's power.
This graphic is with baffles pulled but no tuning
to match. Note the huge dip in the torque . This is probably because there is
no back-pressure and the pipe lengths are random, not tuned for
scavenging. Also note that
at 3,500 rpm, there is an increase of 10 ft lbs of torque from the
previous chart as well as 5 additional horsepower at 5200 rpm.
This is really getting interesting.
|
 |
Having these results in hand, we decided to
go for broke . . . . make the previously-drilled baffles a bunch more free-flowing.
| We enlarged one of the holes and
drilled a new large hole so that one would be able to see straight
through the baffle. Using a tapered reamer (with both of us
holding each baffle in turn), the holes were ground away to
maximum with the tools at hand. The two adjacent pictures show the
two large holes. Looking through the inlet, one will be able to
see through both simultaneously. |
  |
Final Tune (the end of the science
project):
Ed went far beyond the call of duty to give
me the best job he could. His dedication to results and satisfaction far
exceed profit motive. , and then he began to adjust cells in the ECM to
get the best performance. He worked on this tune as hard and diligently as
he did on the first. Like I've said, Ed isn't happy unless it's as good as
can be.
|
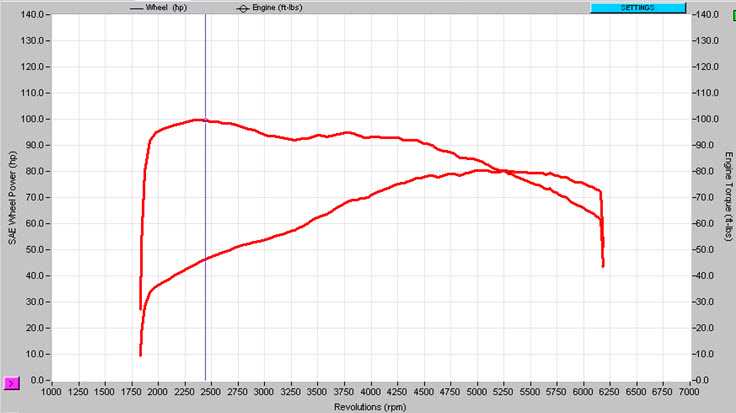
BAFFLES WITH BIG
HOLES
We installed the two holy mufflers (big holes).
Ed did another warm up through the gears and then another WOT run.
The adjacent chart depicts the change in the curves. Mind you,
this is without tuning. We're still using the tune
left over from December 14th with the un-altered Screamin' Eagle
mufflers.
Look how the torque curve has changed. This
proves that back pressure is absolutely required to scavenge exhaust
from the heads.
Also notice peak HP is down a few, but peak torque
is up by maybe 7 ft lbs. The huge torque dip has disappeared.
We could go with this, except that tuning should
make even more improvements. |
 |
|
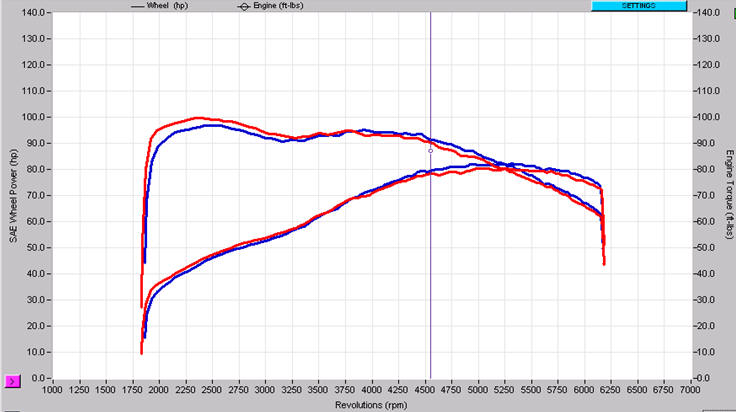
BAFFLES W/BIG HOLES AND
TUNED
Then, Ed went to work, through all of the running,
recording, analysis, modifications, saving, testing, etc. to come up
with the final tune. This is what I'm running now.
Notice that the torque has increased from un-tuned
by 2 to 3 ft lbs to a clean 100 ft pounds of torque. The torque
curve has smoothed out and broadened, my entire cruising regime is above
95 ft lbs or torque.
Horsepower has also increased, approximately
3 points to 80 HP. It is generally the same curve as in the No
Baffles chart.
|
 |
Epilog:
I composed and published this web page for my
own motives; and as a study in how exhaust can effect horsepower, torque, and
their respective curves in a dynograph chart. We found it very
interesting, how different baffle design affects performance, even within the
same mufflers. It is definitely an education on baffle design; which
should be left to the professionals unless one has a dyno facility and plenty of
time on hand. The total time involved at Ed's facility was over 15 hours,
none of which was wasted.
Here is a composite of three WOT runs on the
Dyno, comparing the three muffler modifications.
The next day in Dallas was sunny, 60-degrees,
with almost totally calm winds. It was as good as it gets for testing fuel
economy.
I rode out to I-30 in Mesquite, filled up
with gas taking precise note of the level of the fill. The gas was billed
as 93-Octane, from one of the discount gas stations. Then, rode out to Mr.
Vernon, Texas and back. Kept the speeds at the posted speed limits; 60 mph at
first, 65 for the second 5 miles, and 70 - 72 mph for the lion's share of the
trip. At least 150 miles were at 70+ mph. I accidentally got up to 75 at one
time.
I avoided any drafting of overtaken vehicles
or from vehicles that passed me. My speedometer has been calibrated using
GPS as the standard so the miles should be extremely accurate. I have the Zumo on the handlebars, as well. There
was one stop at the far point of the ride requiring a run through the gears to
enter the highway and get up to 70 mph for the trip back.
Upon returning, I filled up at from the same gas station, motorcycle pointed the
same way, and from the same pump to as close as the same fill as I could
discern. (All the same so the motorcycle would be leaning the same amount as
the initial fill to reduce errors in the 2nd fill amount and thus, the fuel
consumed).
42.13 MPG!
This is almost 10 miles per gallon more than
before! I'm thinking that summertime fuel economy might be even greater,
when density altitudes are 5,000 ft and summer-blend gasoline is dispensed.
My sincere thanks to Ed at
The Dyno
Difference. He went way beyond the call-of-duty to help me. The work
he did wasn't cut and dry like so many clients' tunes. Also thanks
to members of the Harley Tech Talk forum for their input, suggestions, and
interest that kept me motivated to keep investigating even when I was about to
give up. (A new Ultra Limited was looking better and better; but now I'm
totally happy with my '02)
I hope that this documentary helps others
that either have similar experiences or those that simply want to learn more as I did.
March Follow-Up
Instead of being happy with the Screamin'
Eagle baffles (the ones we drilled large holes to relieve the backpressure), I
bought a pair of Cycle Shack baffles that are made specifically for these
mufflers. Apparently, Cycle Shack recognized the highly-restrictive
characteristics of the Screamin' Eagle Street Touring mufflers and designed a
baffle replacement.
After installing the new Cycle Shack baffles,
another tuning session was in order. Quite honestly, I didn't expect that
much tuning would be required; we'd drilled such large holes in the original
baffles (cores). How could Cycle Shack's cores be any less restrictive, I
thought. Boy, I was in for a surprise!
At The Dyno Difference, we rolled the Ultra
back up onto the dyno, strapped it down, installed the O2 sensors, adjusted the
dyno to fit the bike, attached the computer cables, and did the half-dozen other
things required before the actual tuning could start. He also marked the
throttle at the different percentages to analyze the AFR at the different
throttle settings. It's a 30 to 45 minute process just to get ready. Then,
Ed warmed up the bike and ran the bike through the gears several times and held
different throttle settings in a process that I watched but didn't
completely understand. When finished, he displayed the actual
AFR measurements.
What a shock! Where he
previously had my cruising range AFR set at 14.4:1 pretty much across the
board, the AFR now read as rich as 12.9:1 and as lean as 15.5:1!
Some places were rich and some were lean; and not by just a little bit!
This, to me, proved the importance of a professional tune any time the mufflers
or their cores are changed with different design.
Ed's comment: "The
interesting point is that while only the baffle was changed there was quite a
bit of AFR difference between the tune file for the “big holes” baffle with the
Cycle Shack Cores. This just goes to show that any hardware that changes air
flow through the motor changes the AFR values enough that the VE tables need to
be recalibrated to the Target AFR values to have a motorcycle that is running in
optimal conditions all the time. "
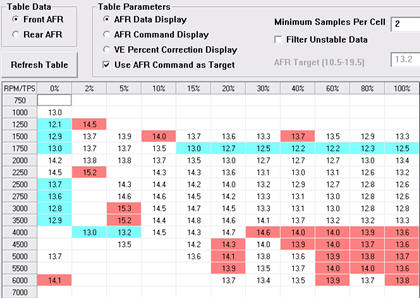
This is the Front cylinder AFR before this
most recent tune. The only change made was the replacement of our modified
baffles with Cycle Shack baffles. The cells marked blue are those where
the resulting AFR had enrichened; the red are those where the AFR was leaner.
(all compared to what the ECU was commanding). The Twin Scan program
colors the cells, in this case when the AFR varies from the command by .2 or
greater.
The WOT 4,000 rpm and above is leaner.
For some reason, the 5% throttle 3,000 and 3,500 rpm range is significantly
leaner, almost a full point than the previous tune, while the 4,000 rpm range
AFR is richer.
And if that's not enough justification for
tuning, look at the AFR for the Rear cylinder!

15.7:1 in the 5% throttle setting at 3,000
rpm. I don't know how often I ride at 5% throttle setting, but look at the
5% to 20% setting at 3,000 and 3,500 rpm range.
And look how rich in the 2,000 through 2250
rpm range with the higher throttle openings.
When Ed saw this, he immediately went to
work, resetting the VE tables to achieve his desired AFR through the throttle
settings and rpm ranges.
It required a couple of hours of work (start
to finish) before the bike was unhooked and rolled off the dyno. The final
dynograph showed that the motor had lost 3 ft pounds of peak torque; but
had gained 3HP at the top end.
The torque curve appears to have been shifted
slightly up the RPM range from 3,750. From that point and greater, the
torque was higher with the Cycle Shack muffler cores. At 3,500 RPM and
lower, the torque was 1 to 3 % lower. Yes, this bothers me a little.
I rarely ride in the higher RPM ranges. I would have preferred to keep the
higher torque numbers. Oh well.
-
The dynamometer has been recalibrated
since the previous test, 1-1/2 months prior.
-
The ambient temperature was cooler for
the previous test and thus the SAE correction factors are different.
-
The 1,750 - 2,300 range has the greatest
torque loss, but I NEVER ride in this regime (and certainly never at WOT).
-
The peak rpm torque loss is at 2,400 rpm,
3 ft lbs; and shifted UP by about 100 RPM from before.
Fuel Mileage Test
So the day after the new tune (for the Cycle
Shack baffles) I took the bike out for a 171 mile fuel mileage test. The
conditions weren't nearly as perfect as the previous test 6 weeks ago.
This time, the wind was blowing at 20 to 25 mph. It was generally a
crosswind on my route on Interstate 30 out towards Mt. Vernon, Texas and back.
As before, I filled up immediately prior to entering the interstate and at the
same pump upon returning. (Actually same station and same pump as the
previous mileage test). I maintained the same speeds as the previous test,
at least as closely as possible.
The fuel mileage was slightly less than
before. In January, I calculated 42.15 mpg. This test of 170.4 miles that
consumed 4.12 gallons of gas resulted in 41.36 mpg; over 1/2 mpg poorer
gas mileage. Yeah, it's disappointing. I was hoping for a
slight increase.
But wait! There are factors that might
explain the difference.
For one thing, it was quite a windy day on
the recent test compared to absolute calm for the previous.
Another factor is the fuel tank fill level.
No matter how precise I tried to be, the fill level can easily be off by one
tenth of a gallon. Do the math:
170.4 miles divided by 4.12 gallons of gas =
41.36 mpg
170.4 miles divided by 4.02 gallons of gas =
42.39 mpg . . . . . .over an mpg greater mileage.
A one-tank mileage just run
doesn't provide enough resolution and thus results in poor precision. A tenth of
a gallon difference between two fill-ups is almost undetectable when looking in
the tank. I could have over-filled by .05 gallons today and under-filled by .05
gallons in January; creating a .1 gallon and 1-mpg error. (or vise-versa
and had a 2mpg difference).
How About the Noise?
Well, I sure was happy with the low noise level of the S.E.
Street Touring Mufflers before drilling the baffles. But I'm getting used
to my Harley sound like . . . .a Harley. With the Cycle Shack baffles, the
sound is slightly louder while riding at 70 mph, but not any louder than the
wind noise (perceived from inside my full face helmet). Yeah, louder than
stock, but not as loud as many I've heard. I can be happy with the noise
level, knowing that it's required to achieve efficiency.
What's in the future?
The ambient temperature for the most recent
test was 70 - 74 degrees. My engine oil temperature never rose above about
170 to 175 degrees while cruising. That's pretty cool, I think.
There may be room to lean the mixture to 14.6:1 or so, without the engine
running too warm. We're waiting for hot weather to make the decision (to
try a slightly leaner mixture). I'm thinking that 14.6 to 14.7 in certain
throttle opening regimes would improve fuel economy without causing greater
engine temperature.
Back to Our Ultra Classic